Using the Supplied Geometry Libraries, Importing Shapemaker Geometry, Loading CAD Geometries , Importing CAD geometries by Group, Applying Textures, Drag-and-Drop, Body-Fitted Co-ordinates
Object Colour, Rotation Options
Rotation Centre, Rotation Mode, Rotate Object Face, Hide Object, Object Affects Grid, Object Constrained by Domain
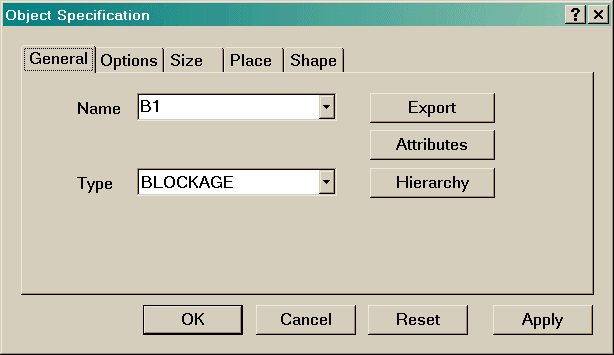
Objects are created by clicking on the 'Object - New Object' menu item from the Object Management Panel, or by clicking on 'Settings - New - New object' from the Top menu bar. Either method brings up an Object Specification dialog box, as shown below.
It has five pages, each of which set different aspects of the object specifications. The lower row of buttons, OK, Cancel, Reset and Apply are common to all pages.
The remainder of this chapter describes the basic principles of selecting, sizing, placing and rotating objects, using the default geometries, and how the objects interact with the grid. These are common to all object types.
The object types and their respective Attributes are described in the next chapter, VR Object Types and Attributes.
A left-button mouse click, while the cursor is over a VR object in the main graphics window, causes that object to be selected. Selected VR objects appear with facet edges drawn in white. The name and type of the selected object will appear in the Tool bar. A set of axes is drawn at the origin of the object bounding box, showing the orientation of the object relative to the domain. The axes are colour-coded using the same colours as the main domain axes.
Double clicking an object (pressing and releasing the left-hand mouse button twice in quick succession) causes the VR Object Specification Dialog to appear. This dialog can be used to modify any of the attributes of the selected object.
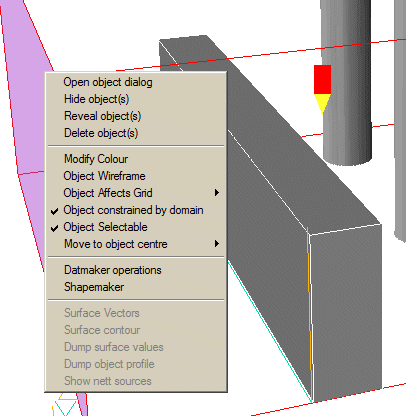
A right-button mouse click on a selected object will cause a context menu to appear which may perform any of the tasks provided on the selected object. The list of tasks is the same as that given in the Action Menu from the Object Management Panel.
If the Mesh Toggle
is on ( on the VR Editor Hand-Set)
then object selection in the main graphics window is
disabled and grid selection is enabled. In this case, clicking in the main graphics window
causes the Grid Mesh Settings Dialog to appear. Details of this are given in the chapter Space and Time Grids. To select an
object when the grid is being displayed, press the <Ctrl> key while selecting.
on the VR Editor Hand-Set)
then object selection in the main graphics window is
disabled and grid selection is enabled. In this case, clicking in the main graphics window
causes the Grid Mesh Settings Dialog to appear. Details of this are given in the chapter Space and Time Grids. To select an
object when the grid is being displayed, press the <Ctrl> key while selecting.
Objects may also be selected from the toolbar, using the pulldown selection.
When the Object Management Panel is open, multiple objects can be selected by picking them from the screen with the control key held down. If the shift key is held down, all objects under the cursor are selected, not just the nearest one.
Object name, Object Type, Export and Hierarchy, Object deactivation
The object Name is at the user's discretion. Character strings up to 12 characters in length, with no embedded blanks are allowed.
All object names are turned to upper-case before use. Duplicate object names are not allowed. If a new object is given the name of an already existing object, the choice is given of modifying the existing object, or entering another name.
Objects are created at the domain origin (0.0, 0.0, 0.0 by default), and with a size of 10% of the domain. If the mesh has been set, and the number of cells in any direction is one, the object dimension in that direction will be the full domain width.
The object Type determines what function the object will perform in the simulation. The object types and their attributes are listed and described in the chapter VR Object Types and Attributes.
The Hierarchy and Export buttons are explained under VR Object Types and Attributes - Assembly.
When first created objects are always activated by default, but it is now possible to deactivate objects from the solution. Deactivated objects may still affect the grid, but they will not feature as input to the solver (eardat & facetdat). This can enable the user to perform, for example, before and after scenarios more simply.
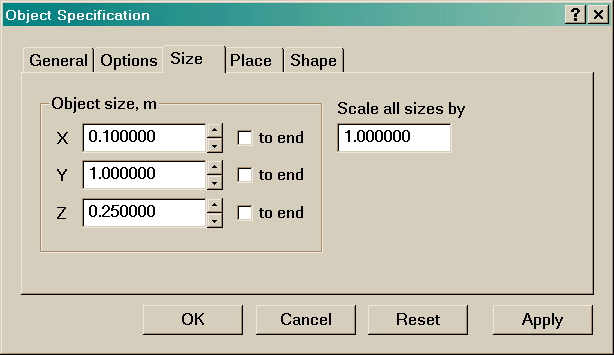
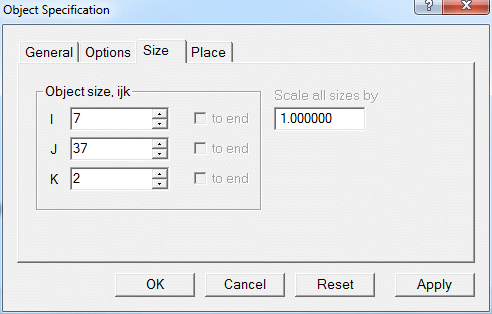
All objects are contained within a rectangular 'bounding box'. The X, Y and Z size edit boxes set the corresponding lengths of the bounding box sides. The 'Scale all sizes by' edit box enables the size of the object to be quickly increased or decreased while keeping the relative dimensions the same. The hand-set Object size up/down buttons also set these values directly. Note that these sizes are in the local co-ordinate system of the object regardless of its rotation.
If any of the 'to end' boxes are ticked, the input box for that direction is greyed out, and the object will automatically extend from its current origin to the end of the domain regardless of later changes to either the object origin (Place) or the domain size.
In a cylindrical-polar system for objects which use the default polar geometries - those whose DAT filenames start 'POL', the X and Y direction sizes are set as dθ - dr in radians and meters respectively.
For all other non-default geometries - those whose names do not start with 'POL', the X and Y sizes are set as dx - dy in meters. This allows the true shape of the object to be preserved.
The image below shows two objects, both with their X and Y sizes set to 0.5.
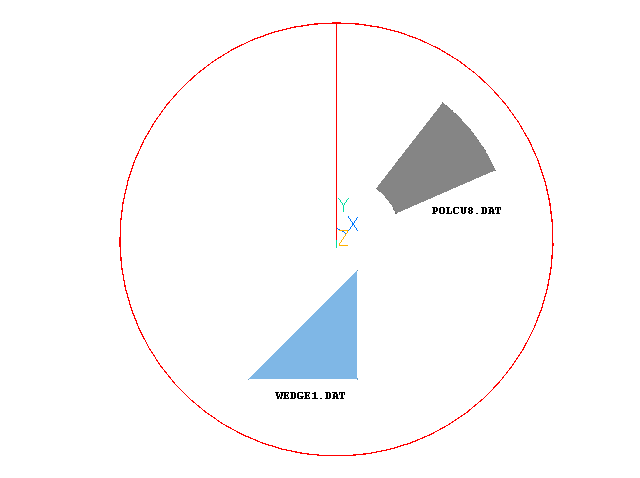
The object on the right uses the default polar geometry, and hence 'fits the grid'. When the X size is changed the object will curve to follow the grid. The size of the bounding box will be the same as the size of the object.
The one on the left uses a non-default geometry and requires PARSOL to remove the step representation. When the X size is changed, the object will change size horizontally, ignoring the curvature of the grid. When the Y size is changed, the object will change size vertically. The size of the bounding box will be adjusted so that a grid line will touch the extremities of the object.
In Body-Fitted Co-ordinates (BFC), the object size is given in terms of the number of cells occupied in each (grid) co-ordinate direction. A two-dimensional object such as a PLATE or INLET will have one of its dimensions set to zero. The Size Up/Down buttons increase or decrease the size by one cell at a time.
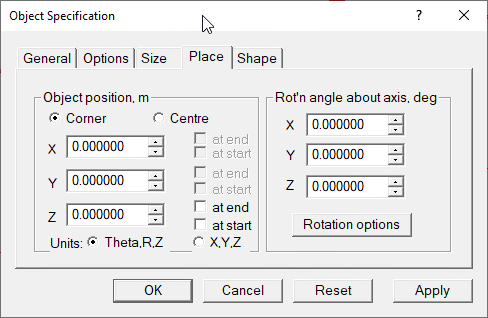
In a multi-block case, the co-ordinates are in the local block I-J-K. An additional input field on the 'Object Place' page specifies the block number.
The object size cannot be set for a GROUP object.
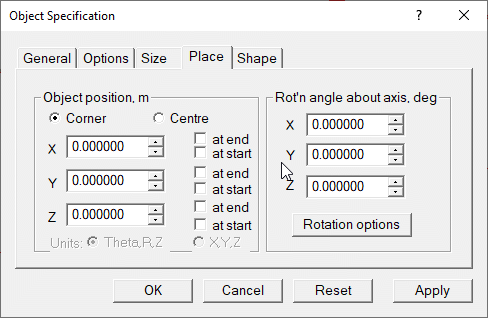
Object Position, Object Rotation Angle

All objects are contained within a rectangular 'bounding box'. The X, Y and Z edit boxes set the co-ordinates, in Cartesian space, of either:
The hand-set Position up/down buttons also directly set these values.
If any of the 'at end' boxes are ticked, the input box for that direction is greyed out and the object is automatically placed as near to the end of the domain as the object size allows regardless of later changes to the domain or object size.
If any of the 'at start' boxes are ticked, the input box for that direction is greyed out and the object is automatically placed at the origin of the domain regardless of later changes to the domain or object size.
If the object geometry name starts with 'POL', then:
For all other geometry names:
The position can denote either:
The object can be made to lie exactly over the axis by setting:
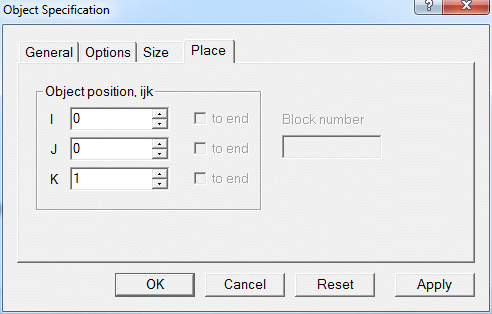
In Body-Fitted Co-ordinates (BFC), the object position is given in terms of the I,J,K cell corner used as the origin of the object. The origin of the grid is at I,J,K (0,0,0). The Position Up/Down buttons move the object by one cell corner at a time.
In a multi-block case, the co-ordinates are in the local block I-J-K. An additional input field, replacing the 'Rotation angle' input fields, specifies the block number.
For a GROUP object, the position refers to the origin of the first object in the group list. When this is changed, the positions of all the other group members are changed by the same amount.
The Object Place page also allows the bounding box (with its contents) to be rotated through an arbitrary angle. By default this will be about the origin of the bounding box. The point about which the object is rotated can be changed from the Rotation Options panel of the Object Options page.
Real values in the range -360 -> +360 are allowed.
The rotations are cumulative, so that 'About Y' will rotate about the Y axis of the 'About Z'-rotated object, and 'About X' will rotate about the X axis of the 'About Z' and 'About Y'-rotated object.
Once an object has been rotated, note that the X, Y and Z sizes are in the rotated co-ordinates of the object, not in the global domain co-ordinates. See 'Rotation options' below.
The rotation angles cannot be changed for a GROUP object.
Using the Supplied Geometry Libraries, Importing Shapemaker Geometry, Loading CAD Geometries , Importing CAD geometries by Group, Applying Textures, Drag-and-Drop, Body-Fitted Co-ordinates
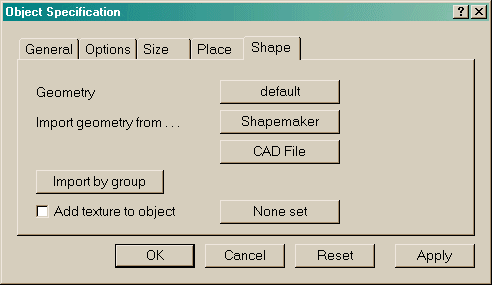
Within the bounding box of an object, the true shape is determined by the geometry file associated with that object. The shape is defined by quadrilateral facets, which are defined in the geometry file. A large selection of geometry files is supplied as a standard part of the installation. A description of the data file format is given in ' Creating the geometry of a Virtual-Reality object'. All the geometry files have a .dat extension.
The default object shape is a rectangular block, which completely fills the object bounding box. Other shapes can be imported from the Geometry dialog box, imported from CAD or made in Shapemaker.
The shape page is disabled for a GROUP object.
Using the Supplied Geometry Libraries
All the standard geometry files are kept in the directory \phoenics\d_satell\d_object, and its sub-directories. Thumbnails of these standard geometry files may be viewed here. Geometry files can also be stored in the current working directory and its subdirectories. These will be searched before \phoenics\d_satell\d_object, allowing local user-created geometries to replace the standard ones.
Clicking on Geometry brings up the dialog box shown below. Use the dialog to browse for the required geometry file.
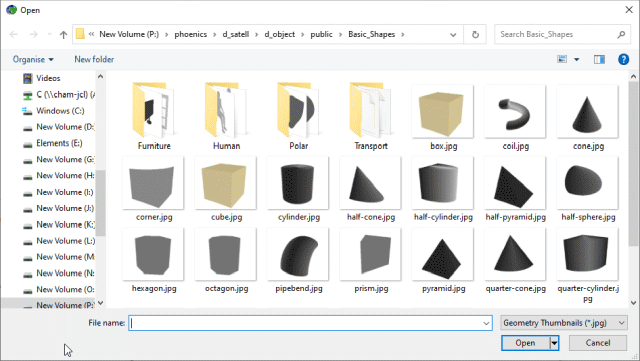
The supplied geometries are divided into a number of categories, with fairly self-explanatory names. The folder public\Basic_Shapes contains a number of geometry primitives, including cuboids, cylinder, cone and wedge.
Polar cases initially display the folder public_Basic_Shapes\Polar. This contains geometry names starting with POL, for example POLCUBE.DAT, indicating that the geometry is suitable for use in cylindrical-polar co-ordinates because it will follow the X grid.
Custom shapes can be loaded from a CAD file, using the CAD Interface button.
Alternatively, the Shapemaker program can be used to create a wide range of shapes, such as:
In each case, the geometry can be controlled parametrically.
Clicking on the Shapemaker button will launch Shapemaker. The image below shows the default shape - a cone.
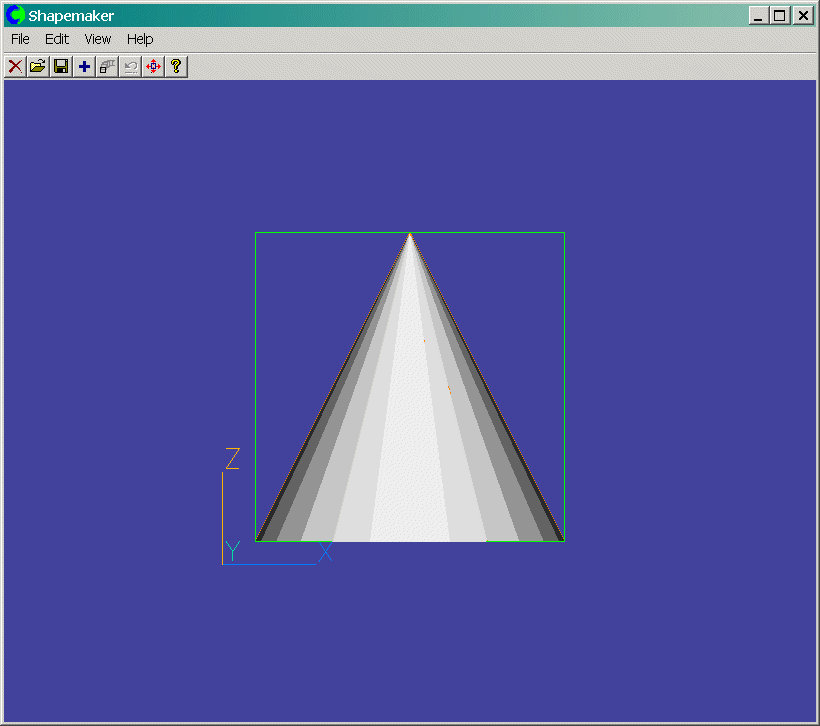
From the Edit menu, click 'Select object', and select the shape from the list by double-clicking on it. Set the parameters as needed to get the right shape. Exit Shapemaker (File - Exit). When prompted to save the facets, click Yes, and enter a file name for the new geometry file. Note that this will be a Shapemaker .GEO file, which retains the Shapemaker parameters. The .GEO extension is preserved in the Q1 so that Shapemaker can be used to adjust the shape parameters at a later stage if needed.
CAD generated geometries may be imported in a number of common formats. Clicking on the CAD button on the Shape dialog will bring up a file browser, which can be used to locate the required CAD file. The interface will translate the CAD file to a PHOENICS-VR .DAT file. This will be stored in the local working directory, or alternatively in the fromCAD folder. A JPEG thumbnail of the imported geometry is also created.
Once translated, these geometries are attached to the current object, and are available for use with other objects of the same shape. For more details see Importing CAD Data.
When a CAD file is imported, the full name of the CAD file is retained and is written to Q1. When the Q1 is next read, a check is made to see if the equivalent DAT file already exists. If it does and it is newer than the CAD file, the DAT file is used. If the CAD file is newer, or the DAT does not exist, the import process is invoked to recreate the DAT file.
Importing CAD Geometries by Group
This option will only be present when creating a new object. It enables several CAD geometries to be read in at one time. For more details see Assembling a Complete Geometry. This button will not appear when the dialog is opened for an existing object.
Note that multiple DAT files, and mixtures of DAT and CAD files, can be imported this way.
Texture files are JPEG (*.jpg) images which are applied to the facets making up the object. In principle JPEG files of any size can be used, but those which are not 64*64 are resized before being used.
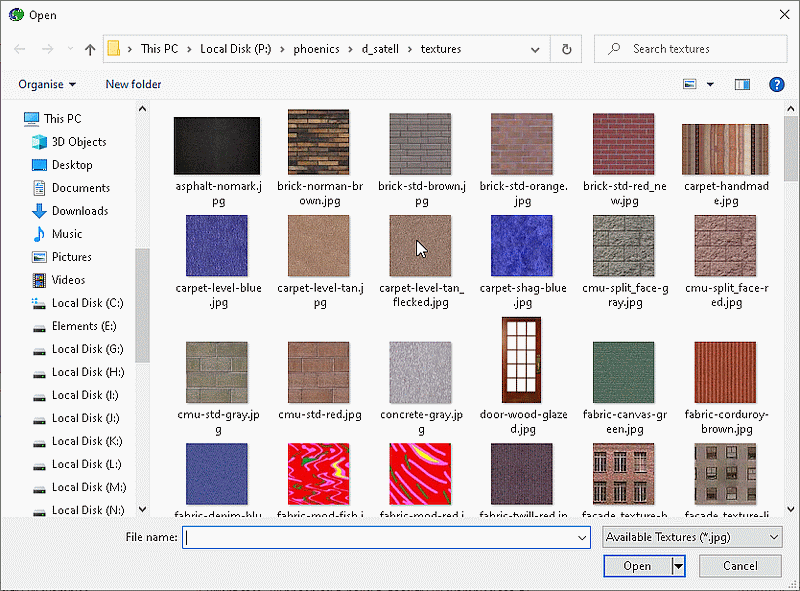
All the standard texture files are kept in the directory \phoenics\d_satell\textures, and its sub-directories. Texture files can also be stored in the current working directory. This will be searched before \phoenics\d_satell\textures, allowing local user-created textures to replace the standard ones.
Clicking on 'None set' brings up the dialog box shown below. Use the dialog to browse for the required texture file.
The effect is to make the image more realistic, for example making a wall out of bricks:
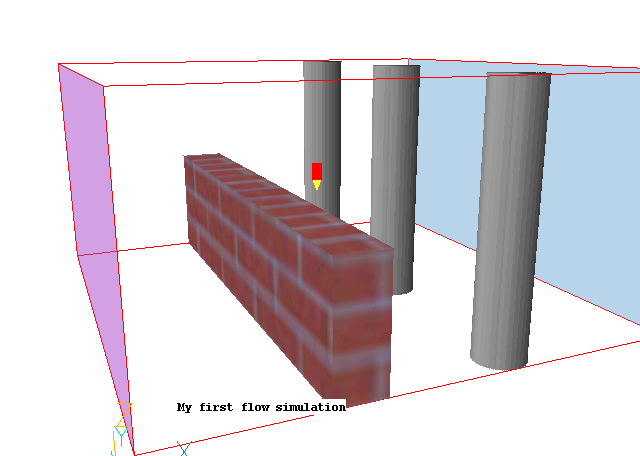
Image: Brick texture applied to an object
Once a texture has been applied, its name replaces 'None set', and the tick-box next to 'Add texture to object' becomes ticked. To remove the texture, just untick the tick-box.
All types of geometry files - DAT files, Shapemaker GEO files or any recognised CAD file, can be imported by selecting the file(s) in Windows Explorer then dragging them onto the VR-Editor graphics window with the left mouse button held down, and then releasing the mouse. The following dialog will appear:
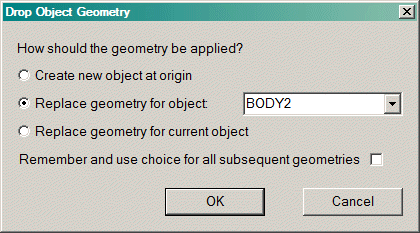
If no object had been selected prior to the drop and the drop point is not over an existing object, the default is to create a new object. If an object had been selected or the drop point is over an existing object, the default is to replace the shape of that object.
In BFC, it is not possible to attach geometry or texture files to objects. Objects take on the shape of the cells they occupy.
Colours are attributed to objects on the basis of their type. The colours correspond to those given for Cartesian Grids in the Default Geometry table. The default colour can be changed from the Colour button on the Options page.
It is not possible to rotate a BFC object, as it is defined by the cells it occupies.
Object Colour and Opaqueness, Hide Object, Wireframe, Object Affects Grid, Rotation Options, Object Constrained by Domain
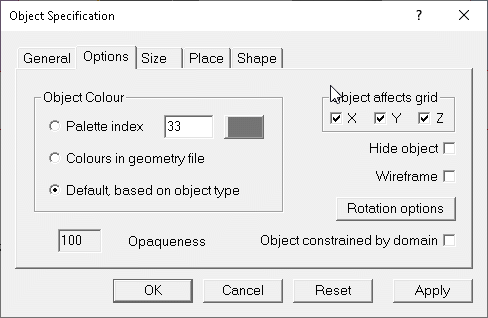
Each object type has a default colour. These are listed here. When 'Default, based on object type' is checked, the colour of the object will be set to the default colour and opaqueness for that object type, regardless of the geometry file.
The geometry files describing the object shape also contain a colour and opaqueness for each facet. If 'Colours in geometry file' is checked, the colour and opaqueness specified for each facet in the geometry file will be used. This is the default for geometries imported from CAD, so any colour and opaqueness information transferred during importation will be used.
Finally, if 'Palette index' is checked, the index specified in the Palette index input box will be used to colour all facets. [Initially this is set to the colour of the first facet in the geometry file]. If the palette index of the colour required is known then it may be entered directly into the palette index edit box. Otherwise click on the Object colour button to the right of the edit box to launch the colour chooser dialog.
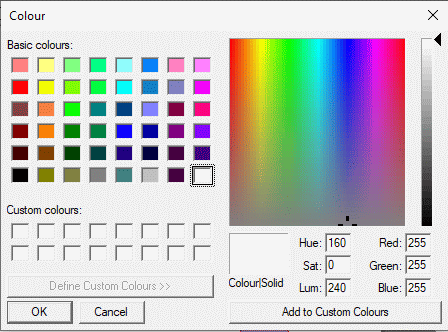
The actual colour used will be the nearest available from the CHAM colour palette.
When 'Default based on object type' is checked, the opaqueness is fixed and is controlled by the object type.
When 'As Colours in geometry file' is checked, the opaqueness for each facet is taken from the geometry file. If the opaqueness is reset, this will override the settings for each facet in the geometry file.
When 'Palette index' is checked, the opaqueness of all facets can also be set.
The input box is actually for the opaqueness. A value of 0 makes the object invisible, 100 is completely solid. The default is 50.
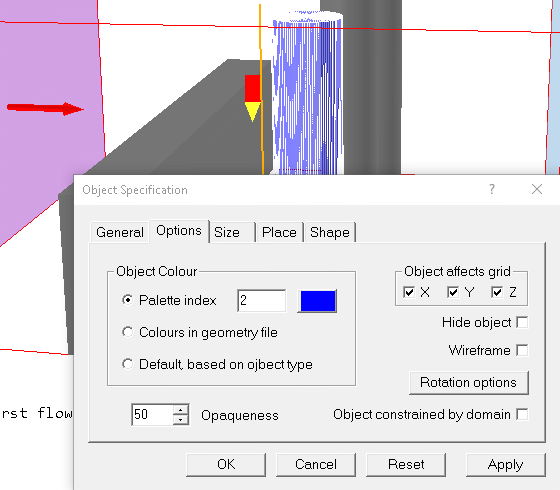
When 'Hide object' is ticked, the object becomes invisible. It can be selected again from the list in the Object management Panel. Remember that invisible objects are still active in the simulation!
When 'Wireframe' is ticked, the selected object is drawn in wireframe.
Rotation Centre, Rotation Mode, Rotate Object Face
The Rotation options button leads to ways of setting the object bounding box orientation.
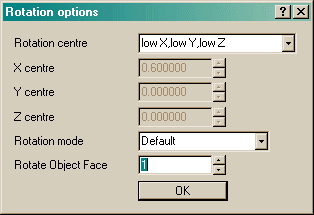
The first option sets the point about which rotation of the bounding box will take place. By default it is set to the 'origin' (low X, low Y, low Z) of the bounding box. The pull down list gives the option to choose any of the other seven corners of the bounding box, the central point within the bounding box or a user-set X,Y,Z point. Only in the latter case do the X,Y,Z centre edit boxes become active.
This gives the options of 'Default' and 'Old method'. The default is to match the regions to the extremities of the rotated geometry. The 'Old method' (as in PHOENICS Version 3.4 and earlier) is to match the region boundaries to the bounding box of the unrotated object. This mode is kept so that models created in earlier versions will generate the expected grid.
With the default rotation mode, the size of a rotated object is set in the rotated co-ordinate system. For example, if an object has been rotated by 90 degrees about Z so that the original X axis of the object now lines up with Y, a change in the X size will change the physical Y dimension on screen. To assist with this the local axes for the current object are drawn in the same colours as the main domain axes (blue, green, yellow for X, Y, Z).
With the old method of rotation, the size of the object sets the size of the unrotated bounding box. See also Object Affects Grid.
Note that two-dimensional objects can only be rotated about an axis normal to the object. The plane of the object must be normal to one of the co-ordinate directions.
This turns the geometry within its bounding box, cycling up or down through the available orientations. In general, there are 24 possible orientations of an object within its bounding box. One end of an object can point at any of the six faces of its bounding box. For each of these six positions, any one of the four sides of the bounding box may be pointing up. This gives a total of 4*6=24 orientations.
For example, a cylinder may lie within a bounding box with its axis aligned with the X, Y or Z co-ordinates, as shown below. In this case, there are three unique orientations. In the case of a cone, there will be six orientations, as the apex of the cone may be at either end of the bounding box.
In the image below, the central cylinder has been rotated within its bounding box so that the axis is along Y.
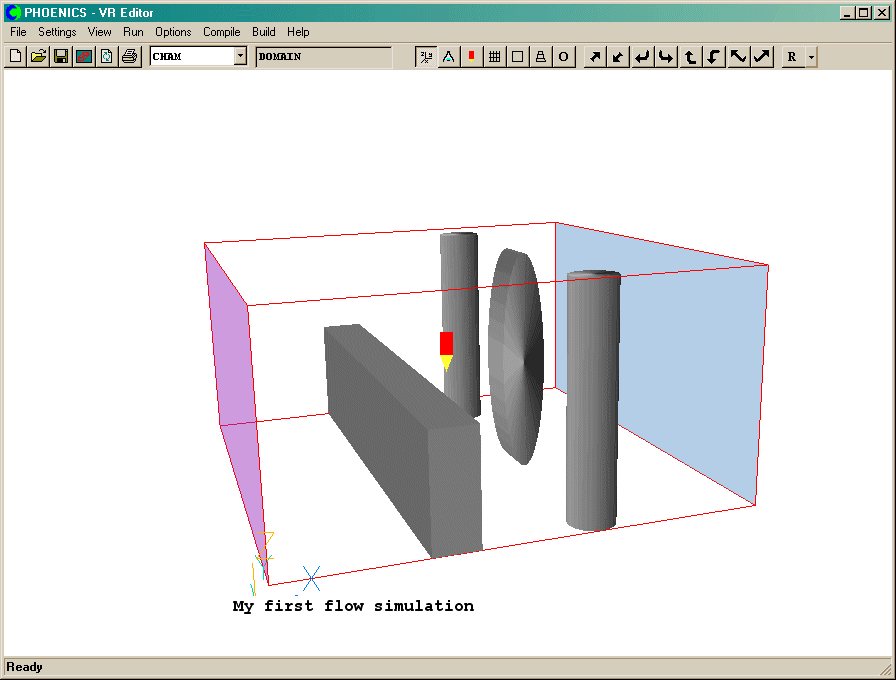
Image: Rotated object
Depending on the shape, many of the orientations will be geometrically identical.
The same effect can be achieved by clicking on the Rotate object up / Rotate object
down buttons ![]() on the VR-Editor hand-set.
on the VR-Editor hand-set.
By default, objects interact with the computational mesh. Turning the mesh toggle
on the hand-set ON causes the
current grid to be displayed on the graphics image:
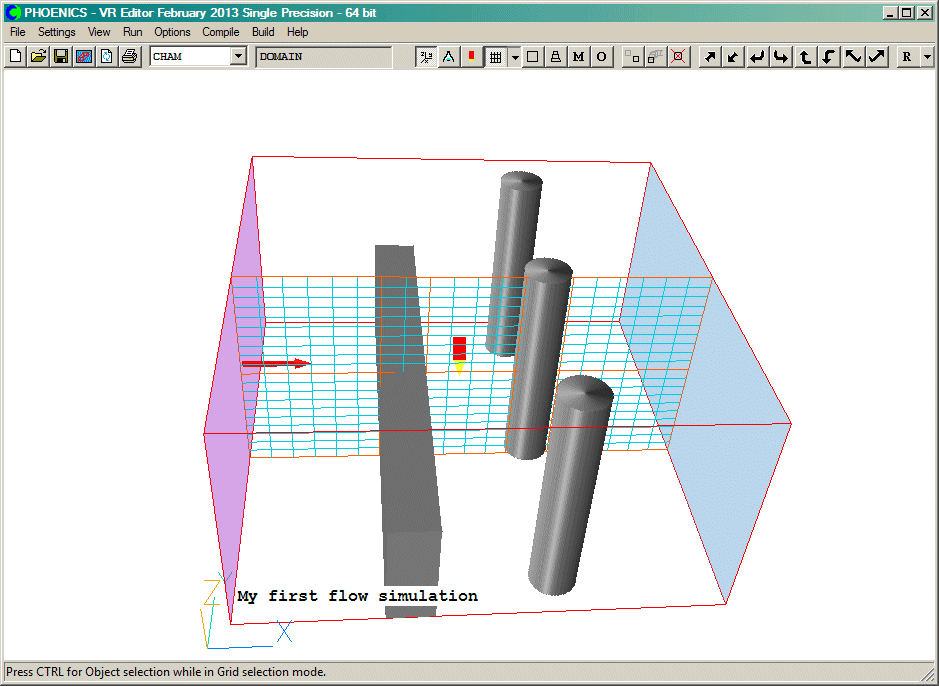
Image: Grid display
The red lines are region boundaries. These are automatically created to match the edges of the object bounding boxes. They are also grid lines. As objects are introduced, removed and resized, the region lines will adapt to match the object layout. The blue lines are 'ordinary' grid lines. The interaction between objects and grid can be controlled separately in each co-ordinate direction.
By default, these are distributed according to the auto-meshing rules. By clicking on the grid, the distribution can be changed, as described in the chapter Space and Time Grids.
It is sometimes convenient to suppress this interaction for a particular object in one (or all) direction(s), for example to prevent the grid from being altered by the introduction of a new object, or to reduce the number of very thin regions in one direction. This is affected by un-ticking the desired direction(s) in 'Object affects grid' block on the Options tab shown above.
In that case, the object will not create regions to match its bounding box.
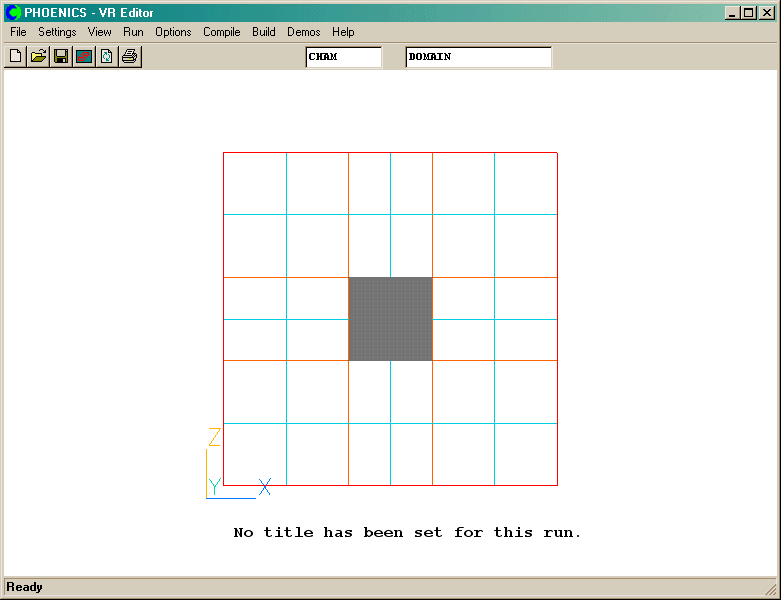
Image: Grid matched to object
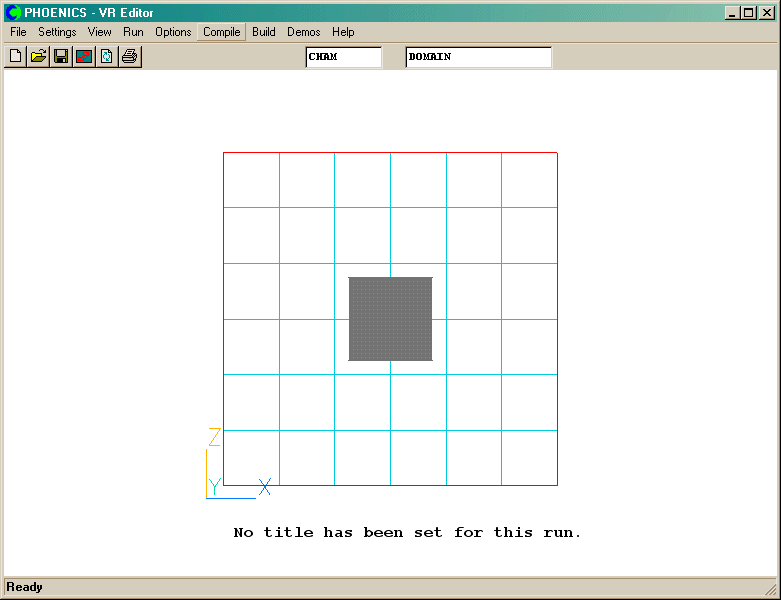
Image: Grid not matched to object in X and Z
Note that some object types, namely Probe, Pressure_Relief, Celltype, Drag_lift, Clipping_plane, Plot_surface and Track_counter never create regions.
When the grid is unmatched, those cells whose centres happen to fall within the volume enclosed by the facets of the object will be affected by the object.
If an object has been rotated about X, Y or Z, and the default rotation mode is used, the region boundaries will be calculated from the minimum and maximum positions of the rotated object.
The following images show the effect of rotating the object by 45 degrees about Y, first in 'Default' mode, then in 'Old method' mode.
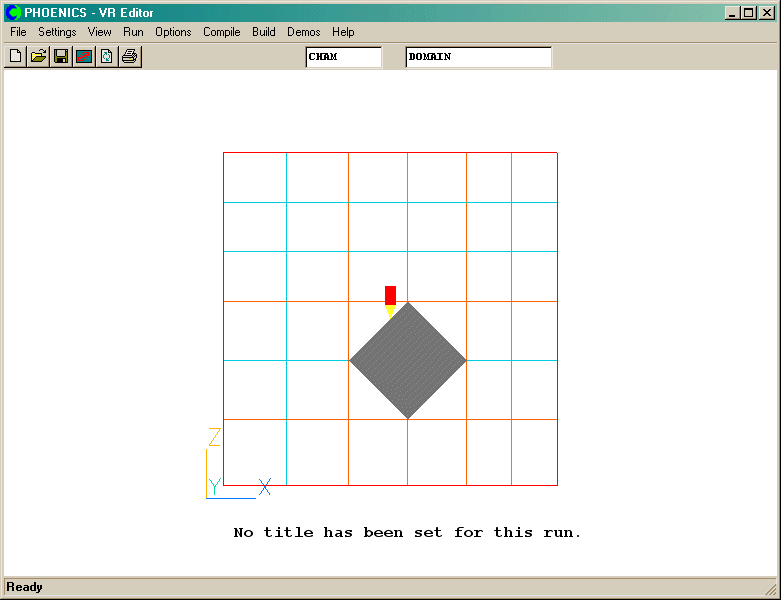
Image: Default rotation mode
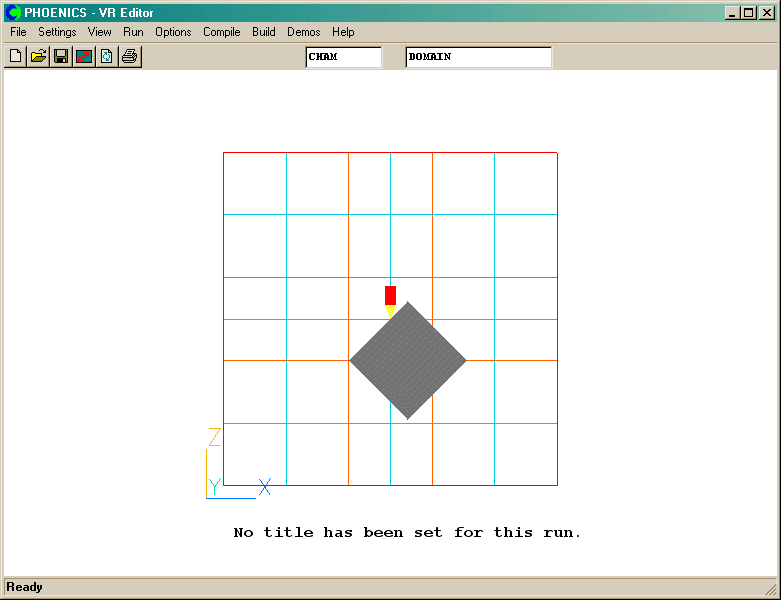
Image: Old rotation mode
In the 'Default' mode, the rotated object can be moved until one of its extremities touches the domain boundary, unless the 'Object constrained by domain' tickbox is cleared when it can be moved through the domain boundary.
With the old rotation method, the object can only be moved until its unrotated bounding box touches the domain boundary.
By default, objects cannot pass through the faces of the domain. Similarly, the domain cannot be made smaller than the largest object. Sometimes it can be convenient to allow objects to partially lie outside the domain - for example to model one half of a body. When 'Object constrained by domain' is unticked, it becomes possible to move objects freely through the domain boundaries, and to make the domain smaller than any unconstrained object. This allows a small detail from a large CAD file to be modeled.
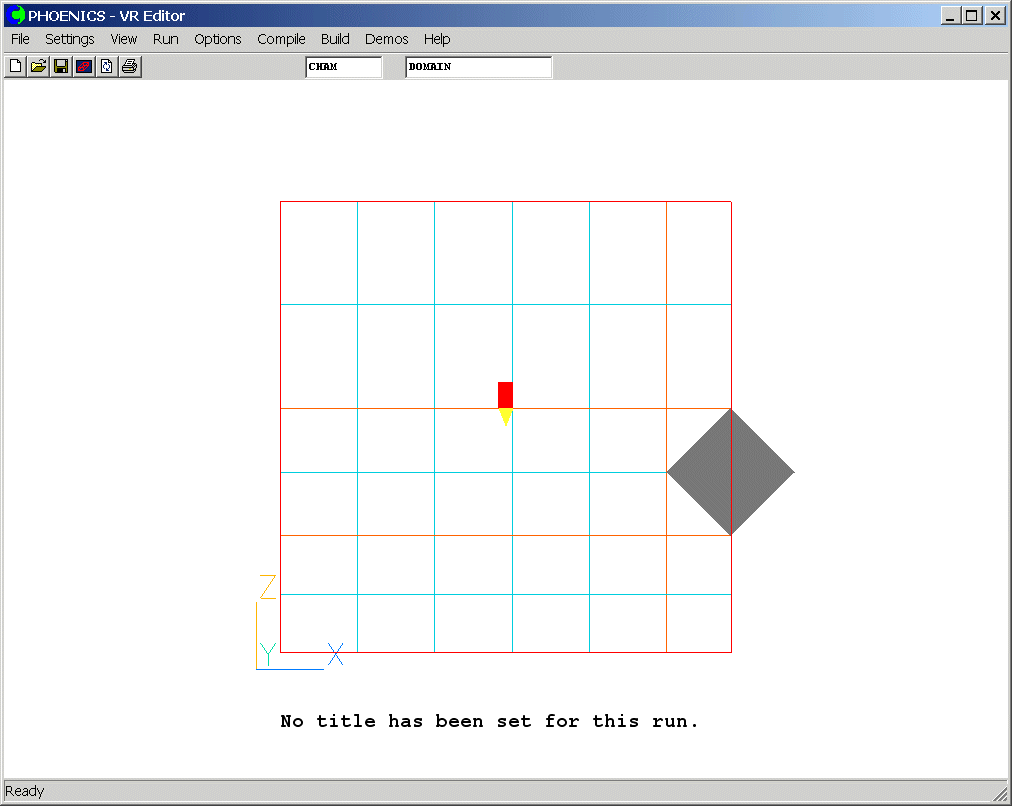
Image: Unconstrained Object